
Monday, October 27, 2014
Be Joyful
Hello there! I just got some happy mail today so I thought I would make a quick card. Here it is.
I received my Simon Says Stamp card kit and some goodies from My Favorite Things today! I thought I would put them together since they were both Christmas themed. The patterned paper panel is from Lawn Fawn Snow Day petite paper pack. I used the reverse side of the stamp packaging from the SSS Be Joyful stamp set to die cut the snowflake using a die from My Favorite Things. I die cut the snowflake from the patterned paper and did the inlay of the white snowflake. I did a quick wash over the snowflake with some clear Wink of Stella. I white heat embossed the sentiment onto some Doodlebug paper and the gray polka paper is from SSS July card kit. The red sparkle brad and enamel dots are from My Mind's Eye. I rounded the corners with We R Memory Keepers Corner Chomper. I used foam tape for the patterned paper panel and sentiment. That's it for today. Thanks for the visit. See you soon.
You're a Hoot
Hello! I'm participating in another challenge. This time, it's for Paper Smooches. I don't think I have a chance of winning at all (there was a stamp designer with an entry) but I thought it would be fun to enter this little pretty bird anyway. Plus, don't we all love a little Paper Smooches? Here it is.


I used a free digi stamp from the Paper Smooches blog because I wanted to make something with a Halloween theme. I used Distress Inks in Seedless Preserves, Dusty Concord and Chipped Sapphire for the background. I stamped the clouds using the Spectrum stamp set from PS. I printed out the owl and gave her a quick coloring with Copics and masked her off so I could make it look like she was in front of the moon. I used Mustard Seed Distress Ink for the moon and Lawn Fawn Stitched Party Banners to die cut the circle. I used the Dots & Dashes dies from Paper Smooches for the strip down the middle of the inked panel. The patterned papers behind the sentiment are from Doodlebug. That's it for now, thanks for stopping by today. See you soon.
French Fry Gift Card Holder
Hi there! I thought I would do a quick post for the Monday Simon Says Stamp Treat Challenge. It's super simple but I thought it would be a nice idea for those who need a quick and clever treat idea. Here it is...
 I was going to make little pockets for the gift cards for the inside of the card but when I went through the drive thru to purchase the gift cards, the cashier said they ran out of the sleeves for the gift cards and gave me these instead. What a lovely idea! All the work was done for me already, just a bit of personalization and it was all done. I used Simon Says Stamp Trick or Treat stamp/die set for the speech bubble and band of goo. The band of goo was stamped with Studio Calico Purple Rain and I used an ink blending tool and Lime Light for the bottom portion of the band. The purple goo got a quick wash of clear Wink of Stella. The names were stamped with Lawn Fawn Violet's ABCs. This might not be "Challenge Worthy", but I hope it helps those who need a cute gift in a pinch. I have a really good treat box for my son's class that's almost ready. Stay tuned. Thanks for stopping by.
Deer on Kraft
Hi there! I couldn't help myself, I had to post one more card for the Simon Says Stamp Get Krafty Wednesday Challenge. Here's a look.
 I used Avery Elle Custom Panels Dies for the snowdrifts. The banner, trees, sentiment, acorns and pine cones are from Papertrey Ink Tinsel and Tags Collection. Pine cones were stamped with Studio Calico Doc Brown ink and the sentiment and acorns are stamped with Simon Says Stamp Khaki ink. The snowflakes are from Lawn Fawn Deck the Halls. The deer is die cut using Lawn Fawn Into the Woods die. I gave the deer a touch of color with Brushed Corduroy and Frayed Burlap Distress inks and the nose and spots are made with a dab of black and white Ranger Enamel Accents. The trees and snowflakes are stamped with Avery Elle Pure White pigment ink. Quick and simple. Thanks for checking this little guy out today. See you soon.
Sunday, October 26, 2014
Season's Greetings on Kraft
Hi! Here's the second card for today. It's for the Simon Says Stamp Wednesday Challenge, Get Krafty. Here's a look.
 Ok, here goes. I used the Cheesecloth background stamp from My Favorite Things in Simon Says Stamp Khaki ink. The solid stars are from Studio Calico Poet Society stamp set stamped using Avery Elle Pigment inks in Raspberry, Aquamarine, Lemon Grass, and Celery. The red star and twinkle sentiment is from the Studio Calico Send Joy stamp set stamped in SSS Khaki ink and Avery Elle Cherry Pigment ink. I ran a strip of glitter tape across the card for some shine, I just can't tell you where it came from, so sorry. The tag was die cut using Paper Smooches Stitched Tag die and the second tag was cut from some Recollections Christmas paper. I used Simon Says Stamp Peace on Earth sentiment for the tag using SSS Lipstick Red ink. The die cut bow is from Papertrey Ink Tinsel and Tags collection. I went over the sentiment and bow with clear Wink of Stella to make the whole thing twinkle and popped up the tags with foam tape. I think that's it. I know I used tons of stuff today. Thanks for checking out my work today. See you soon.
Christmas Blessings #1
Hello there! I'm calling this card Christmas Blessings #1 because I will be using this die cut many times for Christmas cards. This is just another version of a card I did a bit ago, but with more embellishments and different colors. Here it is.
 I used Tim Holtz Holiday Knit stencil and Ranger Texture Paste for the background. I stamped Holiday Anya from the Greeting Farm with Memento Tuxedo Black ink and did a quick Copic coloring on her. I gave her a quick detailing with some Wink of Stella clear and some Ranger Glossy Accents for some shine. The sentiment is from Simon Says Stamp Christmas Blessings die, I colored it with some Black Wink of Stella and used a bit of Tombow Mono Multi glue to adhere it to the card base. The sequins are from Teresa Collins. I popped her up with some foam tape. That's it. I have one more to post after this. Stay tuned. :)
Tuesday, October 21, 2014
Bella Ballerina
Hello! I thought I would finally make a card from the ballerina image from Online Card Classes Copics for Cardmakers. I colored her but didn't get a chance to make a card. Here's the image from day 5 of class.

 I cut the panel with Avery Elle Finished Frames and went over the panel with Tumbled Glass Distress ink. I didn't do the greatest job masking her off before I went over the panel with Ranger Texture Paste, next time... The stencil is from Clear Scraps called Damask. The banner and sentiment is from Mama Elephant Bloomsies die/stamp set. Foam tape behind the banner. That's it for now. Thanks for checking out my Bella today! See you soon.
Here she is all finished.
Sunday, October 19, 2014
Holiday Anya
Hi there! Let's have fun with texture paste today! I was inspired by Kristina Werner's holiday card series for this simple little card. Here's a look.
 I stamped The Greeting Farm's Holiday Anya and Copic colored her with my daughter in mind. I gave her some pinstripes on her jacket and headband and gave her boots a bit of gold bling. The sentiment is from Stampin Up Endless Wishes that I white heat embossed. The background is Tim Holtz Holiday Knit stencil and Ranger Texture Paste. I used foam tape to give her some dimension and called it a day. I kept it super simple. Hope you like the card today. Thanks for stopping by, see you soon.
Friday, October 17, 2014
To the Moon and Back
Hello! It's challenge time again. This Wednesday challenge from Simon Says Stamp is Color Coordinates. The color recipe card for this challenge are Halloween colors! Here's a look at the card.
 I used the Trick or Treat stamp/die set from Simon Says Stamp for the animals and gave them a quick coloring with Copic markers. I used Paper Smooches Shopping Bag die to give the animals a place to relax while I finished the card. The sentiments are from Studio Calico Buttercup stamp set. I stamped the shopping bag using Orange Peel, Green Apple, Slate, Black and Lavender Simon Says Stamp inks. I cut the patterned paper panel from Doodlebug paper using Avery Elle Finished Frames die. I stamped the moon in Memento Tuxedo Black ink and gave the moon a quick wash with a Copic marker, I cut it out and then used foam tape for dimension. Pretty simple. Hope you like it. Thanks for the visit today!
Monday, October 13, 2014
"O" is for Orange Ombre
Hi all! It's challenge time again! The challenge is from Simon Says Stamp Monday challenge blog being inspired by the letter "O". My "O" is for orange and ombre. Here's a look at the card.
 I covered the most dramatic part of my ombre effect with the tag, oops. Well, it's still very orange. I used Paper Smooches Blossoming Buds for the flowers and sentiment and PS for the stitched tag as well. I stamped the flowers in Memento Tuxedo Black ink and colored the flowers with Copics trying to keep within a fall color theme. I die cut the tags and white heat embossed the orange one. I used Ranger Texture Paste and a stencil from Clear Scraps for the background. After the paste dried, I used the Tim Holtz mini ink blending tool and Distress inks including Spiced Marmalade, Wild Honey and Dried Marigold to get an ombre effect. I popped up the tags and flowers with foam tape and finished the card with some gold embroidery thread. Simple and very orange! Thanks for visiting today! See you soon!
Saturday, October 11, 2014
Fall Thank You
Hi there! It's challenge time! This simple card is for Simon Says Stamp Monday Challenge called Fall Love. I love fall, its my favorite time of the year. Here's a look.
 I used Studio Calico The Underground card kit for this card. The large pumpkin was stamped with Simon Says Stamp Orange Peel ink and die cut using SC Buttercup die set. The small orange pumpkin was stamped with Orange Peel as well but using Neat and Tangled On the Strip 2 stamp and die cut with Buttercup die as well. The chevron pumpkin was cut with the same small die using SSS May card kit patterned paper. The wood grain paper is from Tim and Beck. The front panel was embossed with a Darice embossing folder. The sentiment is from SC The Underground stamp set using Doc Brown SC ink. The feathers are die cut using SC die as well. Sequins are SSS Moonshine. Long explanation, easy card. Here's to sweater weather! Thanks for visiting today!
Friday, October 10, 2014
Zombie Dog
Hi there! It's time for another challenge. Sadly, I didn't win last week so I will keep trying until I do. This week's Simon Says Stamp Wednesday challenge is Watercolors! Check this funny little guy out.
 Isn't he ugly? I love him! I used Simon Says Stamp Trick or Treat stamp/die set for the dog and sentiment. I stamped the sentiment in Purple Rain ink from Studio Calico and gave zombie dog a quick coloring with Copics. The dog got some googly zombie eyes with a touch of Ranger black Enamel Accents. The watercolor background is made with a Heidi Swapp stencil and Distress inks in Seedless Preserves, Dusty Concord and Shaded Lilac. The bat stamp is from Michaels dollar bin from two years ago. I punched out that funky square with Studio Calico Buttercup die. The sequins are SC Yes Peas and from Neat & Tangled Birthday Bash Mix. That's it, I hope my ugly little friend gets picked for next week. Thanks for visiting today. See you soon!
Thursday, October 9, 2014
Orange Mug
Hi there! Just another late night post. I'm in love with the Simon Says Stamp card kit this month. The stamp set is called What's Brewing. I'm a bit of a paper hoarder so I decided to hold on to my gorgeous paper and make a quick background paper with another new stamp set. Lets take a look.
 I stamped the mug, did a quick coloring with Copics and then cut it out. I die cut a tiny piece of vellum with Paper Smooches Toppers die to make it look like tea. I used my paper piercer and some gold embroidery thread to make the tea look like its steeping. I used a bit of Kool Tak adhesive behind the vellum to hold the thread in place. I used Ellen Hutson Bokeh Dots for the background paper with SSS Black and Orange Peel inks. I white heat embossed the sentiment and popped it up with foam tape. Easy and simple. Thanks for stopping by. See you soon.
Tuesday, October 7, 2014
Copic Storage
Hi there! I don't have an abundance of Copic markers yet, I've only begun my collection. Therefore, it's hard for me to justify buying a large storage at this moment. I have found a solution for small color blending groups. Tim Holtz Mini Distress Ink Storage Tin!!! Yes, they fit perfectly. I ordered the tins for my Distress Inks and one tin was pretty banged up. I was sent a replacement for the damaged tin but couldn't throw it out. I did my best bending it back into shape by hand and happened to find out that the Copics fit beautifully. Check it out!
 I have 6 Ciao markers, 5 Sketch markers, 1 Copic Multiliner, my Colorless Blender and my white Sakura Gelly Roll pen that all fit happily in this tin. I used Avery removable 1"x3" label and Lawn Fawn Violet's ABCs for the little label. I figured I could remove the label when my collection grows and I'll find another happy home for my Copics. Thanks for popping in. See you soon.
Copic Flower, Day 7
Hello. I went through all of my homework practice sheets and I realized I still had this gorgeous flower that I should have posted for Day 7 of Copic class. I made a quick card, here it is.
 I cut out the flower and adhered it to some grey scrap cardstock that I die cut using Lawn Fawn Stitched Party Banners. I used foam tape to adhere the circle to the card. The green paper is from Avery Elle Everyday Collection. The grey paper is from Live.Love.Paper and I went over the words "Something Amazing" with my lightest gray Copic and some Wink of Stella clear brush marker. The enamel dots are from My Mind's Eye. Easy peasy. Thanks for taking a look today. Bye!
Birthday Banner Balloons
Hi there! This little card was lots of fun today. Sometimes, when all else fails, throw some patterned paper on it. I guess that's the theme for the card today. Take a look...
 Yeah, it got a little "matchy matchy"...I still like it though. Are you going to make me list all the patterned paper? Oh, alright. The patterned papers include paper from Simon Says Stamp card kit from July and October, One Little Bird, American Crafts and Michaels Recollections. I used the SSS Balloons die set and patterned paper scraps for the balloons and American Crafts twine. I adhered the twine with lots of Ranger Multi Medium Matte to keep all of it in place. The banner is from Close to My Heart Artiste Collection. I used my coordinating Cricut cartridge to cut the banner and stamped it in some Memento Tuxedo Black ink. I used some quick Copic coloring for the banner and popped that little guy up with some foam tape. That's it for today. Thanks for stopping by. See you soon.
Saturday, October 4, 2014
Copic Gems
Hi! Here's a clean and simple card from Copic class today. I'm so happy with the results. Take a look.
 I did second generation stamping in Glass Slipper ink from Studio Calico for the gems. I did some quick coloring with the Copics and then white heat embossed over the colored gems. I heat embossed the sentiment from Studio Calico Poet Society stamp set and sized down the panel. I adhered the panel with some foam tape and added Simon Says Stamp Moonshine sequins. That's it, pretty simple. Thanks so much for checking out my work today! See you soon!
Friday, October 3, 2014
Copic Cat
Hello there. This is homework from Copic class, I'm a day behind. The theme was backgrounds. I didn't have the specific colors for the type of backgrounds that there were lessons for. Here's what a made anyway.
 I used Simon Says Stamp Trick or Treat stamp/die set for this little guy. The patterned paper is from SSS May card kit. The web frame is washi tape from Michaels. I die cut the stars with Avery Elle Finished Frames die set, there are all kinds of happy tiny little dies that come with that set. I cut the stars from some scrap yellow paper and did the inlay into the background. I used Purple Rain ink from Studio Calico for the sentiment and used foam tape to pop it up. That's about it for today, thanks a bunch for the visit!
Thursday, October 2, 2014
Bon Voyage
Hello. Here's card number 3 for the Transport It challenge. My husband helped design this one. Let me know what you think, here's a look.
 I used the Naughty Nauticals stamp set from Simon Says Stamp for the ship using Smoke ink. The patterned paper is from Studio Calico's Penny Arcade July card kit. I used my circle Sizzix dies to punch out a window for the ship. I used Paper Smooches Stitched dies to make the travel lines across the map as well as the red "X" (conveniently placed where I live). The tag is from Michaels, I just gave it a bit of color with Stormy Sky and Tumbled Glass Distress inks. The sentiment was stamped using Lawn Fawn Violet's ABCs in SSS Smoke ink. The bottom border of the tag is stamped using SSS Trick or Treat stamp set in Fog ink. The seersucker ribbon is from Studio Calico. The patterned paper panel and tag were adhered with foam tape. I guess that's it for now. Hope you like the husband and wife collaboration...all the good ideas were mine ;). Thanks so much for visiting. See you soon!
Grey Balloons
Hi! It's card number 2 for the Transport It challenge! I thought I would keep it simple. Here's a look at the card.
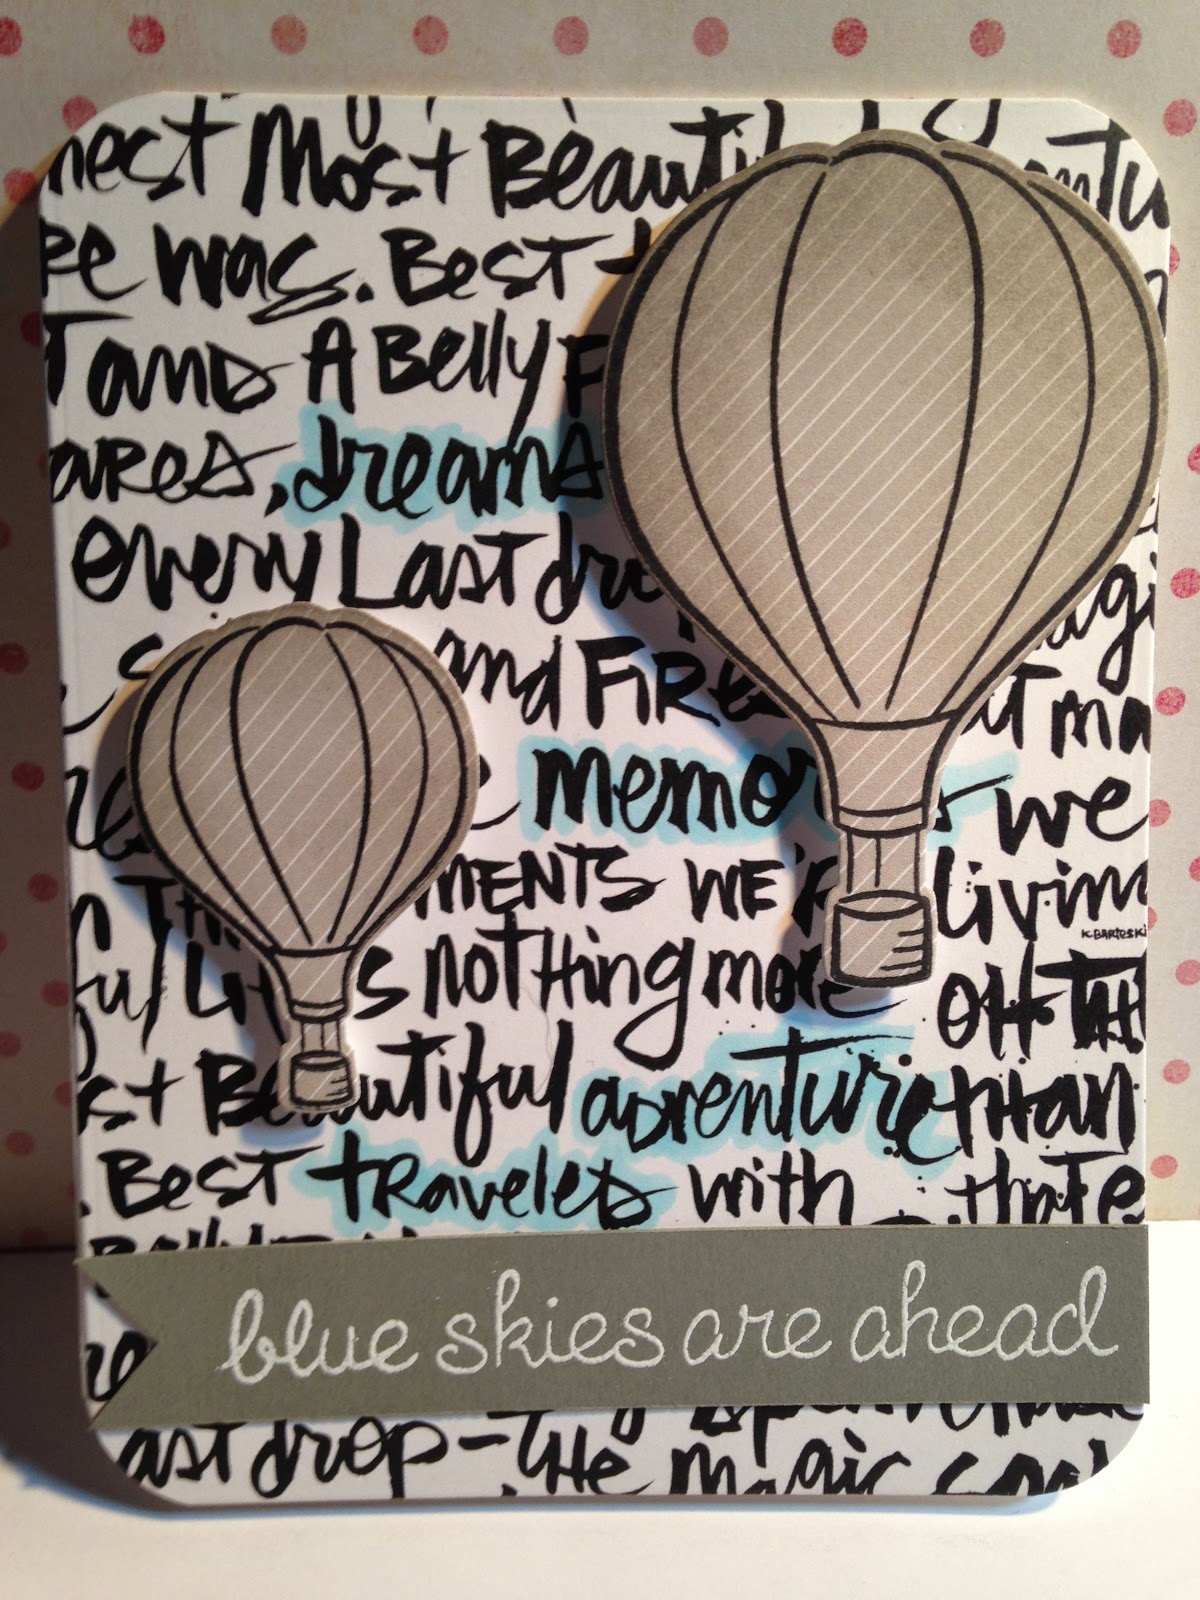 I've been saving this paper for something awesome, I think it's so cool. The patterned paper is from Studio Calico's Penny Arcade July card kit and the balloons are cut from September's Poet Society paper pad from SC as well. I used Lawn Fawn's Blue Skies stamp/die set for the balloons and sentiment. I highlighted the words in the patterned paper with a Copic marker (B000 Pale Porcelain Blue). I went over the edges of the balloons with a touch of Distress ink in Pumice Stone for a bit more contrast and popped them up with foam tape. I chomped those edges with the We R Memory Keepers corner chomper at 1/2". Hope you like it as much as I do. Thanks for stopping by.
Where'd You Wander Off?
Hi there! I've made a few cards for a Simon Says Stamp "Transport It" Wednesday challenge. I have no idea if I have a chance at winning, but here's trying. Here's a look at the first card.
 I thought that the easiest for of transport is...your feet! The patterned paper is from Simon Says Stamp's June card kit. The stamp set is from Studio Calico called You Put a Spring in my Step. I used Dark Chocolate and Soft Navy inks from SSS. I heat embossed the sentiment in copper embossing powder and used Avery Elle's Finished Frames to die cut both panels. The wood veneer stars are from Studio Calico but got a quick coloring with some SSS Khaki ink before they were adhered. Hope you like it. Thanks for checking this little guy out today.
Robot Vampire
Hi there! Here's another card from Copic class. I struggled with putting the card together, just stumped today. I just put it together although I'm not entirely happy with it because when I'm done with it, I'll mail it out to someone and it will make them happy. I like how the coloring came out, just not how I put the card together. Oh well, here's a look anyway.
 I used a Darice embossing folder for the card base. Sizzix circle dies for the patterned paper ring which is from Doodlebug. I die cut the sentiment from some orange foil paper from Michaels. The sentiment is from Simon Says Stamp Trick or Treat die set. The card looked a bit plain so I tied a bit of twine from Lawn Fawn, it's called Cloudy. The image is from Tiddly Inks. I bet if I put a gift card inside, someone would like this card even more. ;) Thanks for stopping by today.
Subscribe to:
Posts (Atom)