Saturday, August 27, 2016

It's Your Birthday

Hello there! I'm up on the Ink Road blog with this easy peasy birthday card. Let's take a quick look...
This happy clam would put a smile on anyone's face. Also, this card would be an easy card to duplicate, you can make a few of these at a time to add to your card stash.
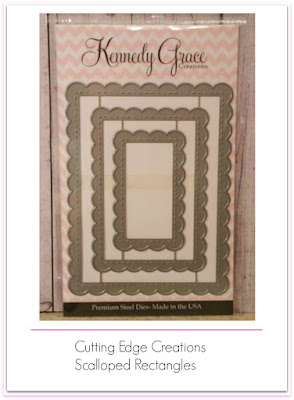
The party patterned paper is from My Mind's Eye, Hooray Paper and Accessories Kit. I die cut some white cardstock with the Scalloped Stitched Rectangle die from Kennedy Grace Creations. I stamped the clam and sentiment from the Year Six stamp set from Lawn Fawn in some Copic friendly Memento Tuxedo Black ink. I quickly colored the clam and the little bed of sand for it to sit upon. I gave the happy clam a bit of shine with some Clear Wink of Stella.
I added some enamel dots to fill in a bit of the negative space and to add some interest to the card. The enamel dots are from the Crate Paper Little You collection
I LOVE these bows from the Millie and June collection from Fancy Pants! There are five sheets of pre-cut bows (30 bows total) included in the package. They are easy to store, easy to put together and perfect for when you run out of ribbon...haha! I added the largest glitter gold bow to the corner of the card to give the card a little bling. I popped up the scalloped panel with some foam tape for some dimension and called it a day. 

Here's a quick list of products used for the card:
Lawn Fawn - Year Six stamp set

 These beautiful products are available at The Ink Road Shop.  Be sure to punch in the code MONICA20 to save 20% off your next order. Use anytime, as many times as you would like. Thank you so much for visiting today. I'll see you soon. 

Tuesday, August 23, 2016

Just a Rose Shaker

Hi there! It's my turn up on the Kennedy Grace Creations blog today with this super simple shaker card. Let's take a look.
I used the Jourdana Collage die from Poppystamps to die cut the dotted front panel of the shaker. I added Scor-tape and a sheet of acetate to make the window for the shaker. I doubled up on foam tape to make sure that the sequin mix has lots of room to move and added the Pink Champagne mix as well as a few of the darker pink sequins from the Frosted Cupcakes mix. I stamped the rose from the Just a Rose stamp set from Kennedy Grace Creations in some Copic friendly Memento Tuxedo black ink and gave the rose a quick coloring. I stamped the sentiment from the same stamp set in Versafine Onyx black. I added a little foam tape behind the rose for a bit of dimension and called it a day. Thank you so much for visiting, I'll see you soon!

Thursday, August 18, 2016

Just a Rose

Hello there! I'm here to share some projects using products from the August release from Kennedy Grace Creations. Let's take a look at all of the new goodies!

Mother of Pearl sequin mix

I have lots to share with you today, let's get started!
I black heat embossed the rose from the Just a Rose stamp set onto some Canson watercolor paper and used Zig Clean Color real brush markers to bring them to life. I used the mid-sized Scalloped Stitched Rectangles die from Kennedy Grace Creations and some gold foil cardstock and then the second smallest die from the Stacked Stitched Rectangles die set to cut the center of the scallop to make a frame. I added foam tape behind the frame and flower for dimension and popped in the sentiment. I added Moonbeams sequins from Kennedy Grace Creations for some shine. 

For this second card, I gold heat embossed the roses from the Just a Rose stamp set onto some Canson watercolor paper and used Peerless watercolors to bring them to life. I let the roses dry and masked them off so I could add some splatter using Heidi Swapp Color Shine in Gold. I die cut the sentiment using the Prayers die and stamp set from Hero Arts. I added some gold cardstock behind the die cut sentiment as a shadow and to make the sentiment pop. I gold heat embossed the smaller sentiment onto some navy cardstock and adhered a panel of the same navy cardstock onto my card base. I trimmed the watercolor panel down so I could offset it onto the card base for some interest.

https://blogger.googleusercontent.com/img/b/R29vZ2xl/AVvXsEgloHQrnl5N7wAtByfQGn2csl_c-M7fTMQmFllAkyy5_drZZFXOKTc84BAjaP-3n50VakGBzGPYUEGmWbapAezYHh5xV4Jx1aJykBnzOYXp9AaXXKna3DjRZo_Yy7zqBS8SWaPxYcO5uW2t/s320/15.00.jpg 
To celebrate the August Release we will be giving away to 1- lucky winner a $15.00 gift certificate to the online store.
All you have to do is :

Leave a comment on this blog post and on all of the stops along the hop.
Be sure to start at the beginning of the hop if you haven't already.


Monica - You are here!


 Thank you so much for visiting today!

Unicorn Shaker

Hello there! I'm up on the Ink Road blog with this colorful shaker card. Let's take a quick look at the card. 
This card just makes me super happy. I'm sure that shaking those colorful sequins would make anyone's day. Let's get right into how I put this card together. 
I started with a panel of white cardstock that measured 2 3/4" x 5 1/2" for the front part of the shaker. I used the Clouds die set from Paper Smooches to pop out those clouds. I adhered some acetate to the back side of the panel with some Scor-Tape and then I took the outline portion of the clouds and adhered them to the front of the acetate. 

I doubled up my foam tape to give the sequins lots of room to move and then carefully sectioned off each cloud with the foam tape so I could put different sequin mixes in with each cloud. I used Peaches & Cream, Tinkerbelle's Sparkle, Limeaid Ice and Iced Berries sequin mixes from Kennedy Grace Creations. I added that colorful paper from Amy Tangerine's Finders Keepers 6x6 paper pad before I adhered the cloud panel. 
I colored the unicorn from the Be a Unicorn stamp set from Avery Elle and gave her mane some shimmer with some Clear Wink of Stella. I used the matching die set to cut her out and adhered half of her body to the top shaker portion of the card. I added a few pieces of the doubled up foam tape to her back hooves and tail. I die cut the Thanks sentiment from some shiny black cardstock from Michael's and the die from the Hello, Thanks and Hi! collection from Little Yellow Bicycle. I adhered the top portion of the sentiment to the shaker and called it a day. 

Here's a quick list of products used for the card:
Kennedy Grace Creations - Peaches & Cream sequin mix
Kennedy Grace Creations - Tinkerbelle's Sparkle sequin mix
Kennedy Grace Creations - Limeaid Ice sequin mix
Kennedy Grace Creations - Iced Berries sequin mix
Little Yellow Bicycle - Hello, Thanks and Hi die set

 These beautiful products are available at The Ink Road Shop.  Be sure to punch in the code MONICA20 to save 20% off your next order. Use anytime, as many times as you would like. Thank you so much for visiting today. I'll see you soon. 

Saturday, August 13, 2016

Splendid Roses

Hi there! I'm sharing a quick card using the beautiful Splendid Roses stamp set to let someone know that they add a little sunshine to your life.
I white heat embossed the roses and used Smoke ink from Simon Says Stamp to blend in some color. I used a die that will be releasing soon from Kennedy Grace Creations, be sure to check back so you can be first to get yours! I added some Distress ink in Squeezed Lemonade for a pop of color and used some foam tape for dimension. I pulled some sequins from Tinkerbelle's Sparkle sequin mix as well as some from the Moonbeams mix for some added shine. 
 
Here is a look at the Splendid Roses stamp set.
 

Thank you so much for stopping by today!

Friday, August 12, 2016

Baby Shower Card

Hi there! I'm up on the Ink Road blog with this colorful baby shower card. Let's take a quick look.
This card is perfect to keep in your card stash and the best part is that it can be used for a baby girl or boy. Let's jump right in to how I put it together. 
I stamped the cloud from the Little You stamp set from Crate Paper and cut it out. I adhered some pink enamel dots from the Little You embellishments collection to the cheeks of the cloud to give it some interest and dimension. 
I used some patterned paper from the Millie & June collection from Fancy Pants and the cloud stamp from Amy Tangerine's Oh Happy Life stamp set. The ink is Mermaid from Lawn Fawn. I only stamped three rows of clouds since the rest of the panel would be covered by the arched rainbow patterned paper panel. 
I used a piece of patterned paper from the Oh Happy Life collection from Amy Tangerine and the Stitched Slopes and Hills die from Simon Says Stamp to make an arch on the top part of the paper panel to give the look of a rainbow. I decided to make a quick banner for the sentiment from the Little You stamp set. I stamped the sentiment, scored the fold lines and cut the fishtails on each end of the banner. I added a bit of foam tape to the center part of the banner and some Scor-Tape for the fishtails to keep it securely adhered. I added foam tape to the back of the cloud and some Puffy Dot stickers from Milly & June

Here's a quick list of products used for the card:
Crate Paper - Little You stamp set
Fancy Pants - Puffy Dot Stickers
Amy Tangerine - Oh Happy Life stamp set

 These beautiful products are available at The Ink Road Shop.  Be sure to punch in the code MONICA20 to save 20% off your next order. Use anytime, as many times as you would like. Thank you so much for visiting today. I'll see you soon. 

Friday, August 5, 2016

Let's Celebrate

Hi there! I'm up on the Ink Road blog with this super happy birthday card. I'm sharing another way to make the most of your themed or special occasion stamps to use them all year round.  Let's take a look.
I love seeing all of those critters together, they're so cute! Let's jump right into how I put this together.
I die cut the paper panel using Simon Says Stamp Stitched Rectangle dies and placed a row of critters that wouldn't be touching. The bunnies are from the Happy Easter stamp set, the chick is from Chirpy Chirp Chirp, the Racoon is from the Holiday Party Animal stamp set and the Hamster is from the Wheelie Like You set, which are all from Lawn Fawn. 
I stamped the birdies that would be touching the first row of animals as a second step because if you wanted to stamp everything together, they wouldn't line up right. The two birdies with hats are from the Lawn Fawn Party Animal stamp set and the bird without the hat is from the Happy Easter set. I masked some of the animals off with some Post-It tape for the next step. 
Here's the fun part, I used the EGG stamp from the Chirpy Chirp Chirp set as a balloon for the critter party! I turned the egg upside down and used the dashed line that was supposed to be used to show the butterfly's flight pattern as the string for the balloon. I drew in a quick string bow with my marker to bring the whole balloon together and because the animals are masked off, the strings look like they are behind them. I used Copic markers to color the critters and balloons and decided to color and die cut some hats and accessories from the Party Animal set. I silver heat embossed the sentiment from the Holiday Party Animal set onto some vellum and taped it on the back side of the panel. I die cut a scalloped black panel as a mat to bring a fun edge to the whole card and called it a day. 

Here's a quick list of products used for the card:
Lawn Fawn - Happy Easter stamp set
Lawn Fawn - Chirpy Chirp Chirp stamp set
Lawn Fawn - Wheelie Like You stamp set
Lawn Fawn - Holiday Party Animal stamp set

These beautiful products are available at The Ink Road Shop.  Be sure to punch in the code MONICA10 to save 10% off your next order. Use anytime, as many times as you would like. Thank you so much for visiting today. I'll see you soon.