Friday, September 30, 2016

Golden Pineapples

Hi there! I'm up on the Ink Road Blog with this fun pineapple card inspired by all the pink for next month's breast cancer awareness month. Let's have a look at the card.
I love all the pink and the gorgeous gold glitter, it's a fun thank you card for any occasion. Let's get right into how I put the card together.
I did some quick ink blending onto some Canson watercolor paper in Spun Sugar and Picked Raspberry, blending to give the panel an ombre look. 
I used a spray bottle to splatter some water onto the panel so I could lift the color where the droplets hit the paper. I used some paper towel to remove the water and set it aside to dry.
After the panel was dry, I used some Gold Tinsel embossing powder from Ranger to heat emboss the pineapples. The pineapples are from the Pop Art Pineapple stamp set from Concord & 9th. I stamped the banner in some gray ink and stamped the sentiment in black ink and used the matching Pop Art Pineapple die set to cut the banner out. I used the Scalloped Stitched Rectangle dies from Kennedy Grace Creations to finish the panel and added foam tape behind it for dimension. 

Here is a quick list of products used for the card:

 These lovely products are available at The Ink Road Shop.  Be sure to punch in the code MONICA20 to save 20% off your next order. Use anytime, as many times as you would like. Thank you so much for visiting today. I'll see you soon. 

Friday, September 23, 2016

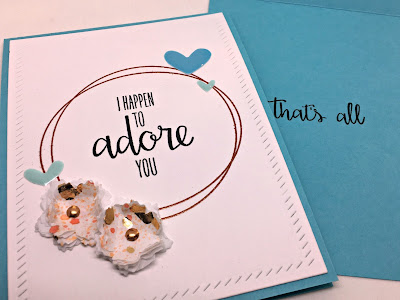
I Happen to Adore You

Hello there! I'm up on the Ink Road Blog with this clean and simple pair of cards. Here's another look at the pair.
I made this quick set of cards to send to a friend and for her to be able to send one to someone she happens to adore as well. Happy mail brightens everyone's day, right? Let's get right into how I put the cards together.
I folded some white tissue paper so I had 4 layers and used some Heidi Swapp color shine in Peach and Coral to spray and splatter some color. I let this dry completely before I moved on to the next step.
I used the Reactive Mist spray from Heidi Swapp for the Minc machine and some rose gold foil. I sandwiched the tissue paper and foil sheet between two sheets of copy paper and fed it through the Minc machine and voila, gold foiled tissue paper!
I die cut the flowers using Concord & 9th Happy Day dies. I ended up using two stacks of flowers (which totals 8 layers of tissue paper) for each completed flower which I held together with a tiny rose gold brad. I ruffled the layers of tissue paper to give the flowers more dimension. I die cut the white cardstock panel using Avery Elle's Finished Frames die set. I used some Rose Gold embossing powder from Simon Says Stamp to heat emboss the circle from the Concord & 9th Love You, Mean It stamp set and then I stamped the sentiment on the front and on the inside of the cards. I added a few enamel hearts from the Oh My Heavens Mix from Illustrated Faith and called it a day. 

Here's a quick list of products used for the cards:
Concord & 9th - Happy Day dies

 These lovely products are available at The Ink Road Shop.  Be sure to punch in the code MONICA20 to save 20% off your next order. Use anytime, as many times as you would like. Thank you so much for visiting today. I'll see you soon. 

Thanks, You are Amazing

  Hi there I'm up on the Kennedy Grace Creations blog today with this bold thank you card to let someone know how amazing they are to you. Let's get right into the card.
I stamped the roses from the Splendid Roses stamp set from Kennedy Grace Creations onto some Strathmore Bristol paper in Onyx Black Versafine ink. I used Zig Clean Color markers to bring the roses to life. I used marker numbers 024, 028, 044, 045 and 091. I used some strips of patterned paper from the Pink Paislee C'est La Vie collection as well as some wood grain cardstock that I added foam tape to for dimension. The thanks sentiment was cut using a die from Lil' Inker Designs and the "You Are Amazing" sentiment is from the Just a Rose stamp set from Kennedy Grace Creations. Thank you so much for stopping by today, I hope to see you soon. 

Friday, September 16, 2016

Bottomless Thanks

Hello there! I'm up on the Ink Road blog having some fun with paper piecing. Let's have a look at the entire card.
Paper piecing is a great way to use up all of those paper scraps you knew were too pretty to throw away. Let's jump right into how I put the card together. 
These adorable teacups are from the Avery Elle Tea Time stamp set. I stamped the cups onto some patterned paper from the Maggie Holmes Gather Collection and then cut them out. 
I used another sheet of paper from the Gather collection but I thought it could use a bit of shine so I clear heat embossed it with the Woodgrain Bold Prints background stamp by Lia Griffith and Hero Arts. 

To stack those little cups, I used an X-acto knife to run a little slit along the front of the tea cup and then slid the bottom of the tea cup at an angle for some interest. I taped the back of the stack after I was happy with how it looked. 

I used the Scalloped Stitched Rectangle dies from Kennedy Grace Creations and a rectangle die to punch out the center to make a frame for the card. I heat embossed the sentiment with some rose gold embossing powder from Simon Says Stamp onto some vellum. I used Scor-Tape to adhere the vellum to the white frame. I used foam tape behind the frame and behind the tea cups to give the whole card some dimension and called it a day. 

Here's a quick list of products used for the card:

 These beautiful products are available at The Ink Road Shop.  Be sure to punch in the code MONICA20 to save 20% off your next order. Use anytime, as many times as you would like. Thank you so much for visiting today. I'll see you soon. 

Friday, September 9, 2016

Make a Wish

Hi there! I'm up on the Ink Road Blog with this elegant birthday card today. Let's take a look at the whole card. 
I colored the cake the same way I would want to eat it in real life, haha! Let's get into how I put the card together.
I stamped the cake from the Concord & 9th Happy Day stamp set in Versafine Onyx Black ink, onto some Canson cold pressed watercolor paper. I gave the cake and flowers some color using Zig Clean Color real brush markers. I used marker numbers 021, 033, 041, 044, 052, 072, 090 and 093. I used the matching Happy Day dies from Concord & 9th to cut the cake...haha. 
I die cut a piece of vellum using Kennedy Grace Creations Stacked Stitched Rectangle dies and temporarily attached the cake to the front of the vellum with washi tape. I turned the vellum panel over and drew in some lines to see where I wanted to heat emboss the base of the sparklers for the cake. I traced the cake as well so I could line the cake up after heat embossing the sparklers. 
I used white embossing powder for the base of the sparklers and Ranger Gold Tinsel powder for the sparkly part. I cut some patterned paper from the Maggie Holmes Gather collection to 4 1/4" x 5 1/2" (A2). I used some 1/8" Scor-Tape on the stitched part of the vellum to try to camouflage the adhesive and added it to the patterned paper panel. I stamped and die cut the sentiment and added foam tape behind it for some dimension. Lastly, I added a touch of white Enamel Accents from Ranger to the "filling" of the cake and the the center of the flowers for some shine. 

Here's a quick list of products used for the card:
Concord & 9th - Happy Day stamp set
Concord & 9th -  Happy Day die set
Maggie Holmes - Gather 12x12 paper pad 

 These beautiful products are available at The Ink Road Shop.  Be sure to punch in the code MONICA20 to save 20% off your next order. Use anytime, as many times as you would like. Thank you so much for visiting today. I'll see you soon.  

Friday, September 2, 2016

Shaker Tags

Hello there! I'm up on the Ink Road blog with this super fun set of shaker tags. These were so fun to make, let's take a quick look. 
These would be so amazing to add to a gift bag or just the finishing touch to a wrapped present. Let's jump right in to how I put these little guys together. 
I die cut some Canson cold pressed watercolor paper using the Pretty Pink Posh Stitched Duo 1 tag die, three times. I used the Tim Holtz ink blending tool and Distress Inks in Spun Sugar and Worn Lipstick for the first tag, Cracked Pistachio and Mermaid Lagoon for the second, and Squeezed Lemonade and Carved Pumpkin for the last. I made sure to blend the tag leaving the very top un-inked for an ombre-type look. 

I die cut the front shaker window using some white cardstock, three times. To die cut the window portion, I used the second smallest die from the Stacked Stitched Rectangle die set from Kennedy Grace Creations. I saved the cut rectangle for another project, you can use any shape die that fits into the tag to create your window. 
I used the same tag die to cut some acetate for the shaker window. I added some Scor-Tape to the back side of the cardstock piece and added the acetate to finish the window. After the window was complete, I added some doubled up foam tape to the perimeter of the window piece. Time to add sequins! For the pink tag, I added Tinkerbelle's Sparkle sequin mix. For the blue tag I added the Kindness Medley sequin mix and for the yellow tag I added the Peaches & Cream sequin mix which are all from Kennedy Grace Creations. For a little more sparkle, I added a little shake of Iridescent Hearts and Starts glitter from Martha Stewart. 
I stamped the hamsters and their wheels with some Copic friendly Memento Tuxedo black ink. The adorable hamsters are from the Wheelie Like You stamp set from Lawn Fawn. I used the Wheelie Like You die set to cut them out after I gave them a quick coloring. I adhered each wheel to the front of the tag and then added some foam tape to the back of each hamster to give them some dimension. I finished the tags with Wood Veneer Hearts and Wood Veneer Scripty Hugs from Lawn Fawn and tied them with some natural twine from May Arts. 

Here's a quick list of products used for these tags:
Lawn Fawn - Wood Veneer Hearts

 These beautiful products are available at The Ink Road Shop.  Be sure to punch in the code MONICA20 to save 20% off your next order. Use anytime, as many times as you would like. Thank you so much for visiting today. I'll see you soon.